


System Setup 2 - tuning a closed loop mixer system
01/02/09
In the previous article, I explained how to tune an open loop system. Now we’ll build on that and deal with a closed loop system.
 Here is the main settings page for the Leonardo closed loop controller (click for larger image), and as you can see, there are a fair number of options. You don’t need to panic though, it’s not normally too hard to set them up. Other makes and models of controller will have different feature sets, different software, or even plug in units - in fact you can buy a handheld unit that will plug into the Leonardo and configure it without using a computer.
As an aside, if you have a 4 (or less) cylinder engine, then you might consider the Galileo unit which has a built in 4 cylinder injector disconnect/emulator.
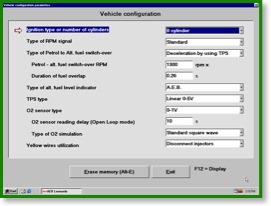
First we’ve got some basic input settings – number of cylinders, type of ignition signal, type of throttle pot, type of lambda probe (O2 sensor), type of lambda probe emulation, and type of alternate fuel sensor. These all need setting to match your vehicle and LPG conversion.
Then we’ve got the options for how you want the system to work – principally how & when to switch over to alternate fuel (LPG).
I’m not going to go into detail about these settings here (scroll down to the end for that) as it will vary from controller to controller.
Each controller will have it’s own initialisation method. For some, there is a set sequence you need to go through to configure the system and teach it how to drive your installation. For others, it’s simpler and you can tune it from the laptop (or handheld controller) later.
For the Leonardo, start the engine, let it idle for a few moments, increase to a fast idle of about 2000rpm and hold it for a short while (say 10s), let it idle again. This is sufficient to teach the Leonardo about the throttle pot, lambda probe, and control valve default position.
At this point you can use the system, and it will probably give reasonable results - but you ideally want to adjust it slightly.
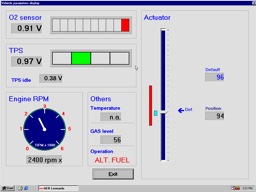 Hook up your laptop or handheld controller, configure anything that needs changing, then get it to display the sensor readings. This may be a simple list of numbers, or it may include some visualisation. Here are a couple of snapshots of the Leonardo screen – and you can see that you get a very good insight into what the system is doing. On the one screen you have engine speed, throttle position, mixture (O2 sensor), and most importantly the position of the gas power valve (Actuator).
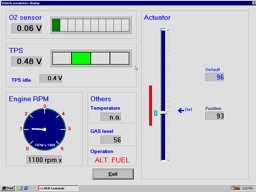 On the actuator display, the vertical blue bar shows the full range of travel with a ‘thumb’ showing the current position. To the left of this is a light blue bar showing the allowed range of positions when idle, and a red bar showing the range of allowed positions when out of idle. To the right is a pointer showing the current default position, and a couple of text boxes showing the default and actual positions numerically.
Vary the engine power gently from just above idle to about 3,000 rpm and watch the actuator position. If your reducer is set correctly then the actuator will open and close around the default position.
If you find that the valve (actuator) progressively opens more, or progressively closes, as you increase power, then you’ll need to adjust the reducer to get best results. What’s happening is that your bias setting is wrong and the controller is automatically compensating. The system will still work but every time you change power, the controller has to compensate for the change in mixture. Just tweak your bias screw a little and try again.
What should the default position be ?
Well general opinion seems to be that anywhere around 100 to 150 is ideal, even a fair bit outside that is OK. If it’s over 200 or under 50 then the mixer is probably the wrong size for your engine.
So that’s it ! I said last time that a closed loop controller is a lot easier to adjust.
Lets go over the settings available to you, but again, this is for the Leonardo - other systems with have different sets of features and may call them by different names.
Ignition type or number of cylinders – fairly obvious - there’s a choice of 3 to 8 cylinders ! There are options for dual coil or single coil per cylinder setups as well.
Type of RPM signal - Standard or Weak. Standard usually works, if the unit doesn’t detect the ignition pulses then try weak.
Petrol to Alt. Fuel switchover. Here you configure when the unit will switch over. “Alt. fuel start up” is useful on a carb vehicle as it means you can leave the unit set to LPG and use a separate switch (carb switch) to control the petrol/gas operation (the Leonardo doesn’t have a “neither fuel” position and so can’t do the “switch the petrol off and let the carbs empty before turning on the gas” operation.) The normal setting is “TPS Deceleration” which will switch over when the engine is above the switchover speed AND the throttle is closed AND the engine is decelerating - this means it will switch when the engine is not under load and generally gives a smooth changeover. If you don’t have a throttle pot connected (I hadn’t got one fitted to my carbs when I first converted), then ”RPM Deceleration” will switch without reference to the throttle pot.
In addition, on the optional configurations page, there is a facility to set a minimum switchover temperature – so the system will not switch over while the reducer is too cold. It requires that you fit a temperature probe into the reducer.
Duration of fuel overlap controls the delay between turning on the LPG and turning off the petrol. It gives time for the gas mix to fill the intake before cutting off the petrol.
Type of alt. fuel level indicator – what type of level sensor is on your gas tank. Apart from “A.E.B.” and “0 – 90 Ω”, there are options for custom and low fuel only. Custom brings up a dialog where you can specify the input values for empty, low fuel, ¼, ½, ¾, and full. Low fuel only allows you to use a switch to indicate low fuel.
TPS type – type of throttle position sensor (a.k.a. throttle pot) fitted. Options are “linear 0 – 5V (0V is closed), linear 5 – 0V (5V is closed), switch direct or switch inverted (just a switch to say “out of idle”), Monobosch, or none.
There is also a setting under optional configurations where you can enter a TPS hysteresis value – this is useful where the idle is controlled by the main throttle instead of a separate idle air bypass valve. In these cases, the LPG controller will see the throttle open and close slightly at idle, and setting a hysteresis value tells it to ignore small movements,
O2 sensor. Set the type to match what you have fitted, and set the emulation to whatever is appropriate for the petrol ECU (options are Open, Ground, Standard square wave, and Constructed square wave).
Sensor reading delay (Open Loop) tells the unit how long to ignore the sensor for after startup. It takes a short time for the sensor to heat up before it gives a sensible reading. This settings control how long the unit runs in open loop mode (actuator at default position) and ignores the sensor output.
Yellow wires utilisation. This sets the function of the “yellow wires”, a pair of normally closed contacts. They can be used to disable the injectors, or to reset the ECU as many ECUs can throw up fault indications when running on gas.
The main tabs of interest on the Optional Configurations page are Actuator and Cut-off.
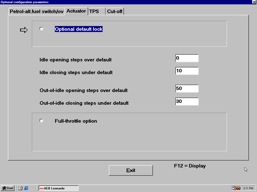 On the Actuator tab, you can set the limits above and below default when in and out of idle. Don’t set these too wide as an over rich mixture can result in a misfire, a misfire results in unburned fuel and air going down the exhaust, the oxygen present is sensed and assumed to be a weak mixture, and so the mixture is richened even further.
You can also set a fixed default position instead of letting the unit adjust it automatically as you drive. And you can set a fixed actuator position, such as for a richer mixture, when on full throttle.
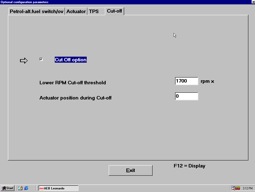 The Cut-off tab is more interesting. You can set a rev limit and actuator position, and whenever you have the throttle fully closed AND the engine speed is above the limit you have set, then the actuator will be moved to the fixed position set. This makes quite a difference when slowing down, and when descending hills as it can weaken the mixture or turn the gas off altogether. The difference in power between throttle closed and “no fuel” is detectable.
As an aside, if you have a 4 (or less) cylinder engine, then you might consider the Galileo unit which has a built in 4 cylinder injector disconnect/emulator.
So lets look at this settings page.
First we’ve got some basic input settings – number of cylinders, type of ignition signal, type of throttle pot, type of lambda probe (O2 sensor), type of lambda probe emulation, and type of alternate fuel sensor. These all need setting to match your vehicle and LPG conversion.
Then we’ve got the options for how you want the system to work – principally how & when to switch over to alternate fuel (LPG).
I’m not going to go into detail about these settings here (scroll down to the end for that) as it will vary from controller to controller.
Getting started
Each controller will have it’s own initialisation method. For some, there is a set sequence you need to go through to configure the system and teach it how to drive your installation. For others, it’s simpler and you can tune it from the laptop (or handheld controller) later.
For the Leonardo, start the engine, let it idle for a few moments, increase to a fast idle of about 2000rpm and hold it for a short while (say 10s), let it idle again. This is sufficient to teach the Leonardo about the throttle pot, lambda probe, and control valve default position.
At this point you can use the system, and it will probably give reasonable results - but you ideally want to adjust it slightly.
Getting a view inside the engine
Vary the engine power gently from just above idle to about 3,000 rpm and watch the actuator position. If your reducer is set correctly then the actuator will open and close around the default position.
If you find that the valve (actuator) progressively opens more, or progressively closes, as you increase power, then you’ll need to adjust the reducer to get best results. What’s happening is that your bias setting is wrong and the controller is automatically compensating. The system will still work but every time you change power, the controller has to compensate for the change in mixture. Just tweak your bias screw a little and try again.
What should the default position be ?
Well general opinion seems to be that anywhere around 100 to 150 is ideal, even a fair bit outside that is OK. If it’s over 200 or under 50 then the mixer is probably the wrong size for your engine.
So that’s it ! I said last time that a closed loop controller is a lot easier to adjust.
More about the settings
Lets go over the settings available to you, but again, this is for the Leonardo - other systems with have different sets of features and may call them by different names.
Ignition type or number of cylinders – fairly obvious - there’s a choice of 3 to 8 cylinders ! There are options for dual coil or single coil per cylinder setups as well.
Type of RPM signal - Standard or Weak. Standard usually works, if the unit doesn’t detect the ignition pulses then try weak.
Petrol to Alt. Fuel switchover. Here you configure when the unit will switch over. “Alt. fuel start up” is useful on a carb vehicle as it means you can leave the unit set to LPG and use a separate switch (carb switch) to control the petrol/gas operation (the Leonardo doesn’t have a “neither fuel” position and so can’t do the “switch the petrol off and let the carbs empty before turning on the gas” operation.) The normal setting is “TPS Deceleration” which will switch over when the engine is above the switchover speed AND the throttle is closed AND the engine is decelerating - this means it will switch when the engine is not under load and generally gives a smooth changeover. If you don’t have a throttle pot connected (I hadn’t got one fitted to my carbs when I first converted), then ”RPM Deceleration” will switch without reference to the throttle pot.
In addition, on the optional configurations page, there is a facility to set a minimum switchover temperature – so the system will not switch over while the reducer is too cold. It requires that you fit a temperature probe into the reducer.
Duration of fuel overlap controls the delay between turning on the LPG and turning off the petrol. It gives time for the gas mix to fill the intake before cutting off the petrol.
Type of alt. fuel level indicator – what type of level sensor is on your gas tank. Apart from “A.E.B.” and “0 – 90 Ω”, there are options for custom and low fuel only. Custom brings up a dialog where you can specify the input values for empty, low fuel, ¼, ½, ¾, and full. Low fuel only allows you to use a switch to indicate low fuel.
TPS type – type of throttle position sensor (a.k.a. throttle pot) fitted. Options are “linear 0 – 5V (0V is closed), linear 5 – 0V (5V is closed), switch direct or switch inverted (just a switch to say “out of idle”), Monobosch, or none.
There is also a setting under optional configurations where you can enter a TPS hysteresis value – this is useful where the idle is controlled by the main throttle instead of a separate idle air bypass valve. In these cases, the LPG controller will see the throttle open and close slightly at idle, and setting a hysteresis value tells it to ignore small movements,
O2 sensor. Set the type to match what you have fitted, and set the emulation to whatever is appropriate for the petrol ECU (options are Open, Ground, Standard square wave, and Constructed square wave).
Sensor reading delay (Open Loop) tells the unit how long to ignore the sensor for after startup. It takes a short time for the sensor to heat up before it gives a sensible reading. This settings control how long the unit runs in open loop mode (actuator at default position) and ignores the sensor output.
Yellow wires utilisation. This sets the function of the “yellow wires”, a pair of normally closed contacts. They can be used to disable the injectors, or to reset the ECU as many ECUs can throw up fault indications when running on gas.
Other settings
The main tabs of interest on the Optional Configurations page are Actuator and Cut-off.
You can also set a fixed default position instead of letting the unit adjust it automatically as you drive. And you can set a fixed actuator position, such as for a richer mixture, when on full throttle.